
Why a Plumbing Vent Diagram Matters
A plumbing vent diagram is one of the easiest ways to understand how a home’s drainage system really works. Most people think plumbing is only about water going down the drain, but a proper plumbing system also needs air. Without air movement, drains can gurgle, traps can lose their water seal, toilets can bubble, and sewer gas can enter the home.
A plumbing vent is part of the DWV system, which stands for Drain-Waste-Vent. The drain and waste pipes carry wastewater away from sinks, toilets, tubs, showers, washing machines, and other fixtures. The vent pipes allow air into the drainage system and allow sewer gases to escape safely through the roof or another approved termination point.
In simple words, plumbing vents help drains breathe.
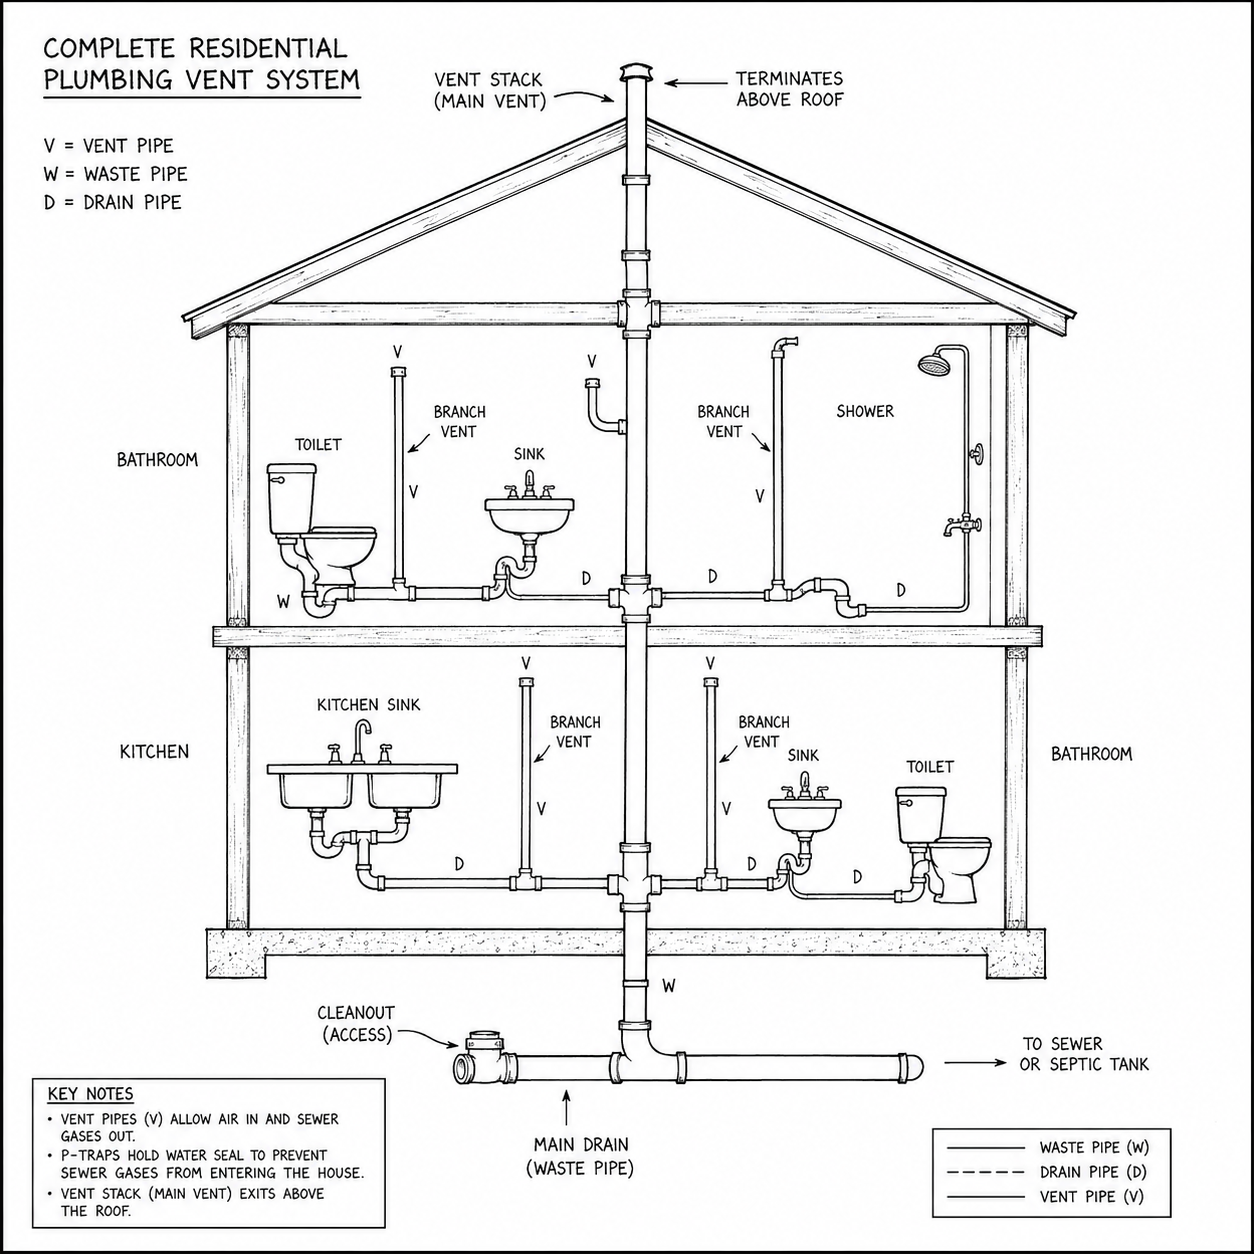
A clear plumbing venting diagram shows how the vent stack, branch vents, trap arms, P-traps, drain lines, and roof vent connect together. Whether you are trying to understand a bathroom plumbing vent diagram, a kitchen sink vent diagram, a toilet vent diagram, or a wet vent plumbing diagram, the same basic principle applies: every fixture trap must be protected from pressure changes.
This guide explains plumbing vents in detail, including how they work, why they are needed, common plumbing vent types, basic plumbing venting rules, code-related considerations, common problems, and where each type of diagram fits into your blog content.
What Is a Plumbing Vent?
A plumbing vent is a pipe that connects to the drain system and allows air to enter or leave the drainage piping. In many homes, the main vent pipe continues upward through the walls and exits through the roof. This roof termination is often called a VTR, meaning Vent Through Roof.
The plumbing vent does not usually carry wastewater. Its main job is to balance air pressure inside the drainage system. When wastewater moves through a drain pipe, it can create negative pressure behind it. If there is no vent, that pressure can suck water out of the P-trap. Once the trap seal is lost, sewer gas has a direct path into the building.
A vent pipe also helps relieve positive pressure. If air or sewer gas builds up inside the drainage system, the vent provides a safe path for that gas to move upward and exit outdoors.
So, when people search for what are plumbing vents, plumbing vents explained, or how do plumbing vents work, the simplest answer is this:
A plumbing vent protects the water seal in fixture traps by balancing air pressure inside the drain system.
Why Do Plumbing Drains Need Vents?
Every fixture that drains water also needs a way to protect its trap seal. A P-trap is the curved pipe under a sink, tub, or shower drain. It holds a small amount of water after each use. That water forms a barrier that stops sewer gases from entering the room.
Without proper venting plumbing, the moving wastewater can create suction. This suction can pull the water out of the trap. This is called siphonage. On the other side, pressure can also push against the trap seal. This is called backpressure.
A properly designed plumbing vent system helps prevent:
- Gurgling drains
- Slow drainage
- Sewer smell inside the house
- Bubbling toilets
- Empty P-traps
- Poor fixture performance
- Unsafe sewer gas movement
This is why plumbing venting is not optional. It is a core part of sanitary plumbing design.
How Do Plumbing Vents Work?
To understand how plumbing vents work, imagine turning a bottle of water upside down. If air cannot enter the bottle, the water comes out slowly and unevenly. But when air can enter, the water flows more smoothly. A plumbing drain works in a similar way.
When water flows down a drain, air must replace the space left behind. The vent pipe allows that air to enter. It also gives sewer gas a safe path out of the system.
In a basic drain vent diagram, you will usually see:
- A fixture, such as a sink or toilet
- A P-trap
- A trap arm
- A vent connection
- A branch vent
- A main vent stack
- A building drain
- A sewer or septic connection
The vent pipe must connect in the correct location so it can protect the trap. If the vent is too far away, the trap arm may siphon. If the vent is installed incorrectly, it may not protect the fixture at all.
That is why diagrams are so important. A basic plumbing venting diagram helps homeowners, DIY learners, and content readers visualize where the vent line belongs.
Main Parts in a Plumbing Vent Diagram
A good plumbing vent pipe diagram should include the following parts:
1. P-Trap
The P-trap is the curved section of pipe below a fixture. It holds water to block sewer gas.
2. Trap Arm
The trap arm is the pipe between the trap and the vented drain connection. Its length is controlled by plumbing venting rules.
3. Drain Pipe
The drain pipe carries wastewater away from the fixture.
4. Vent Pipe
The vent pipe allows air to enter the drain system and allows sewer gases to exit safely.
5. Branch Vent
A branch vent connects one or more fixture vents to a vent stack or stack vent.
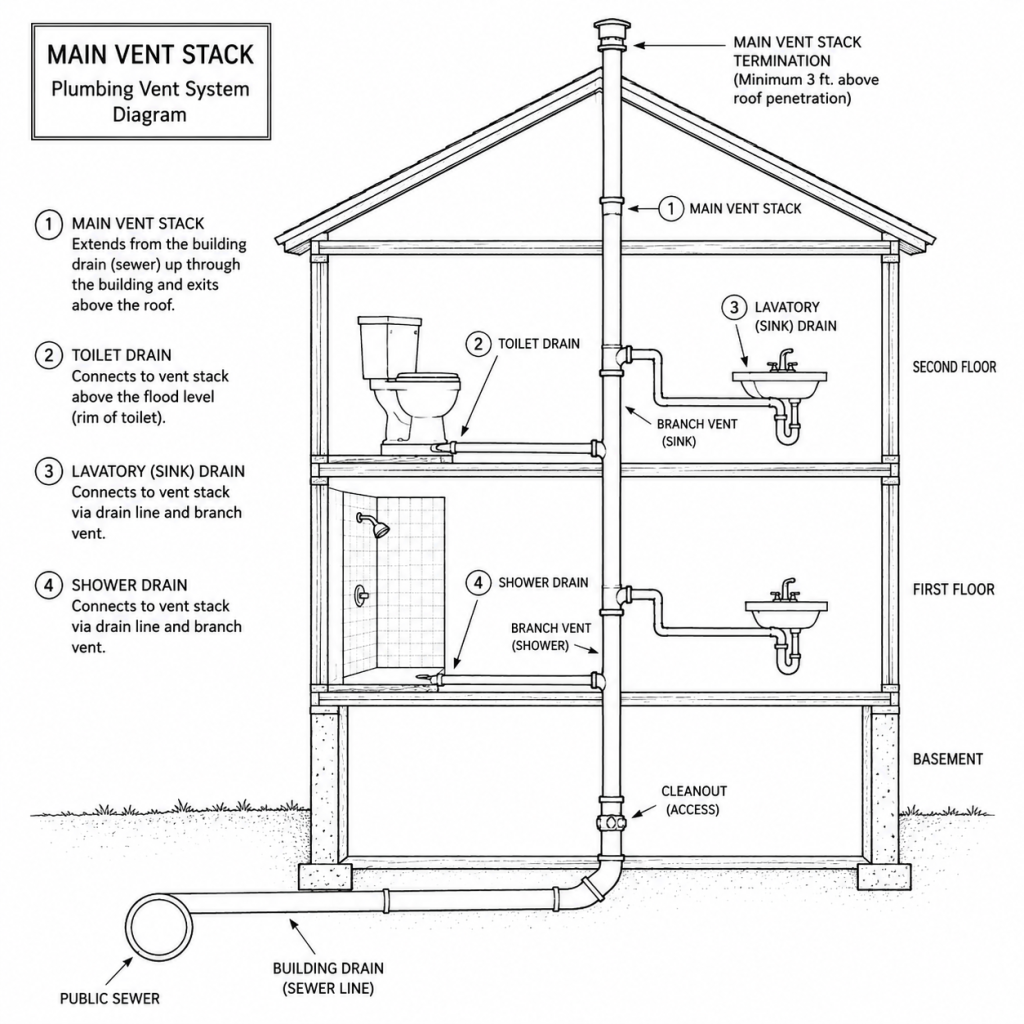
6. Vent Stack
A vent stack is a vertical vent pipe that extends upward through the building and often terminates above the roof.
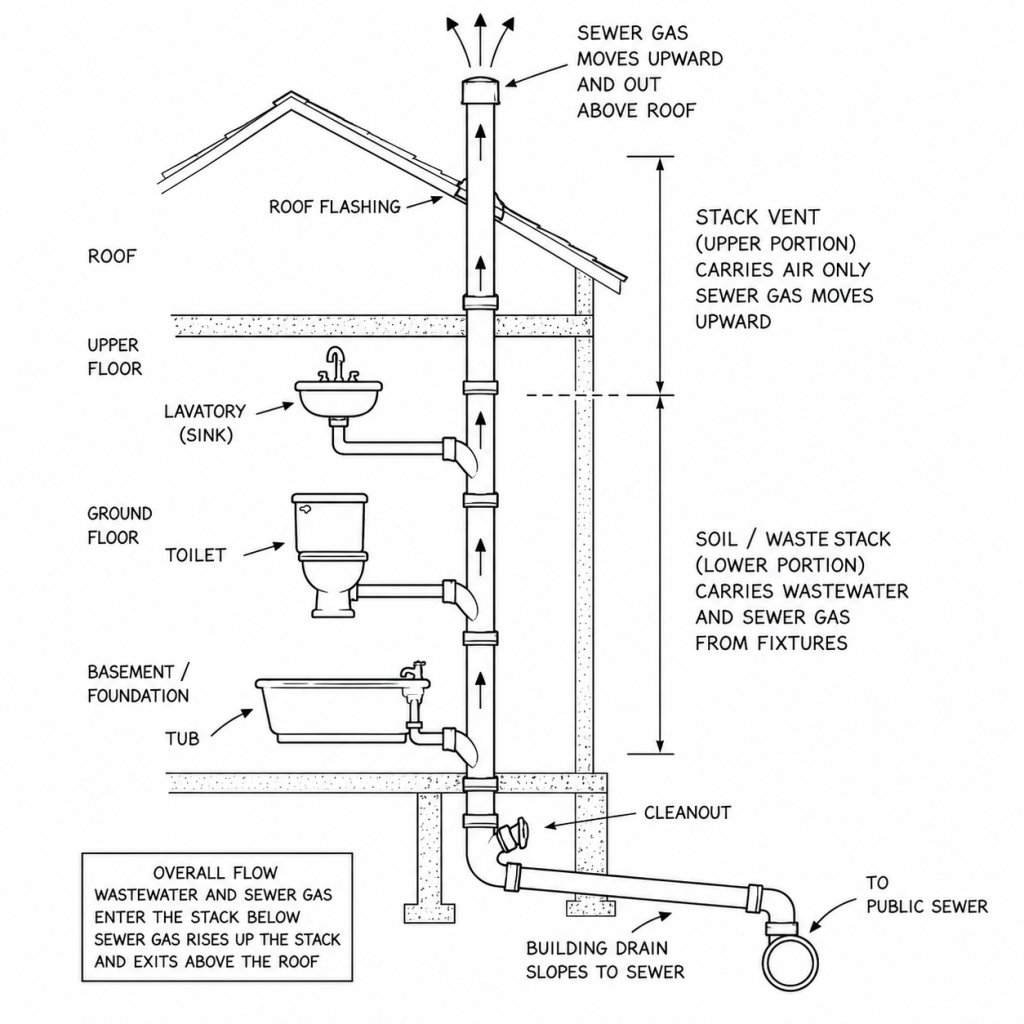
7. Stack Vent
A stack vent is the upper portion of a soil or waste stack that continues above the highest fixture and acts as a vent.
8. Building Drain
The building drain is the horizontal pipe that carries wastewater toward the sewer or septic system.
Main Vent Stack Diagram
Stack Vent vs Vent Stack
Many people confuse stack vent and vent stack, but they are not exactly the same.
A vent stack is a dedicated vertical vent pipe. Its purpose is venting, not carrying wastewater.
A stack vent is the upper portion of a soil or waste stack. The lower portion carries wastewater from fixtures, while the upper portion continues through the roof and works as a vent.
In a stack vent diagram, you will usually see the waste stack below and the vent portion above the highest fixture connection.
This distinction matters because plumbing vent design depends on how the pipe is being used. A pipe that carries waste below may become a vent above the highest connected fixture.
Stack Vent Diagram
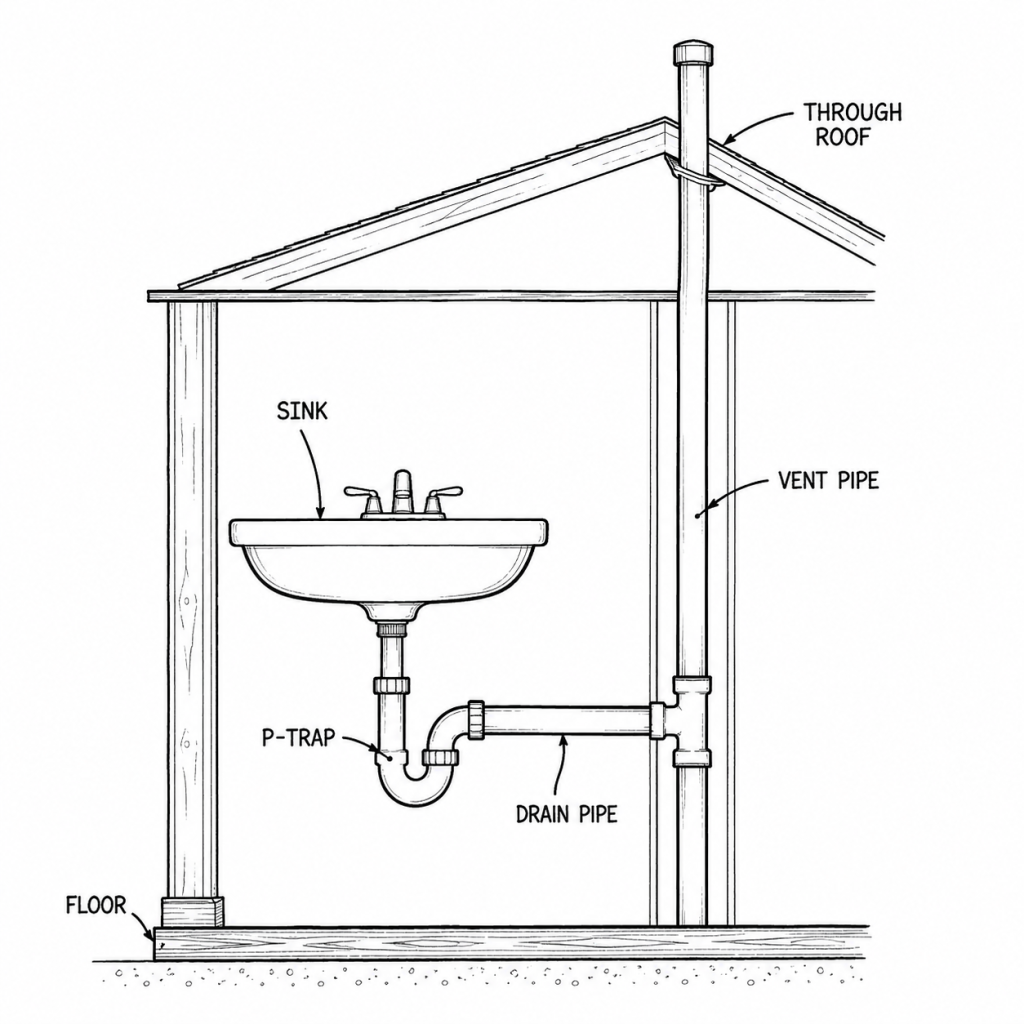
Individual Vent Plumbing
An individual vent serves one fixture trap. This is one of the simplest and most traditional venting methods. For example, a bathroom sink may have a P-trap under the basin, a drain pipe leaving the trap, and a vent pipe rising vertically from the drain line.
Individual vent plumbing is common because it is easy to understand and widely recognized. It is often shown in a bathroom sink vent diagram or sink drain vent diagram.
In a typical setup:
- Water leaves the sink through the drain.
- The P-trap holds water to block sewer gas.
- The drain line carries wastewater away.
- The vent pipe rises from the drain line.
- The vent connects to a branch vent or continues to the roof.
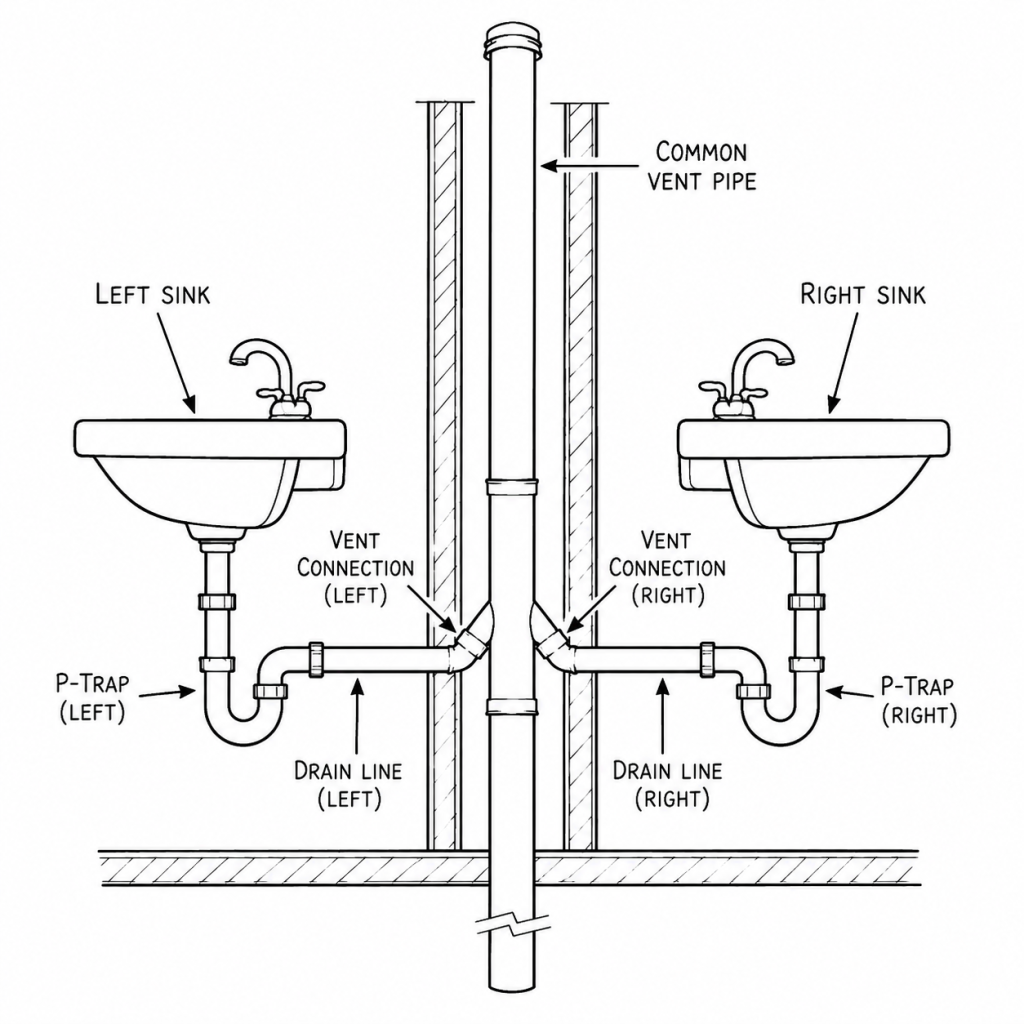
Common Vent Plumbing
A common vent allows two fixtures to share one vent pipe. This is often used when two sinks are installed back-to-back or side-by-side. Instead of installing two separate vents, one common vent can serve both fixture traps when installed correctly.
A common vent plumbing layout usually includes:
- Two fixture drains
- Two P-traps
- A shared vertical vent pipe
- A central connection between the trap arms
This type of vent is efficient because it reduces extra piping. It is often used in bathrooms with double lavatories or fixtures located on opposite sides of the same wall.
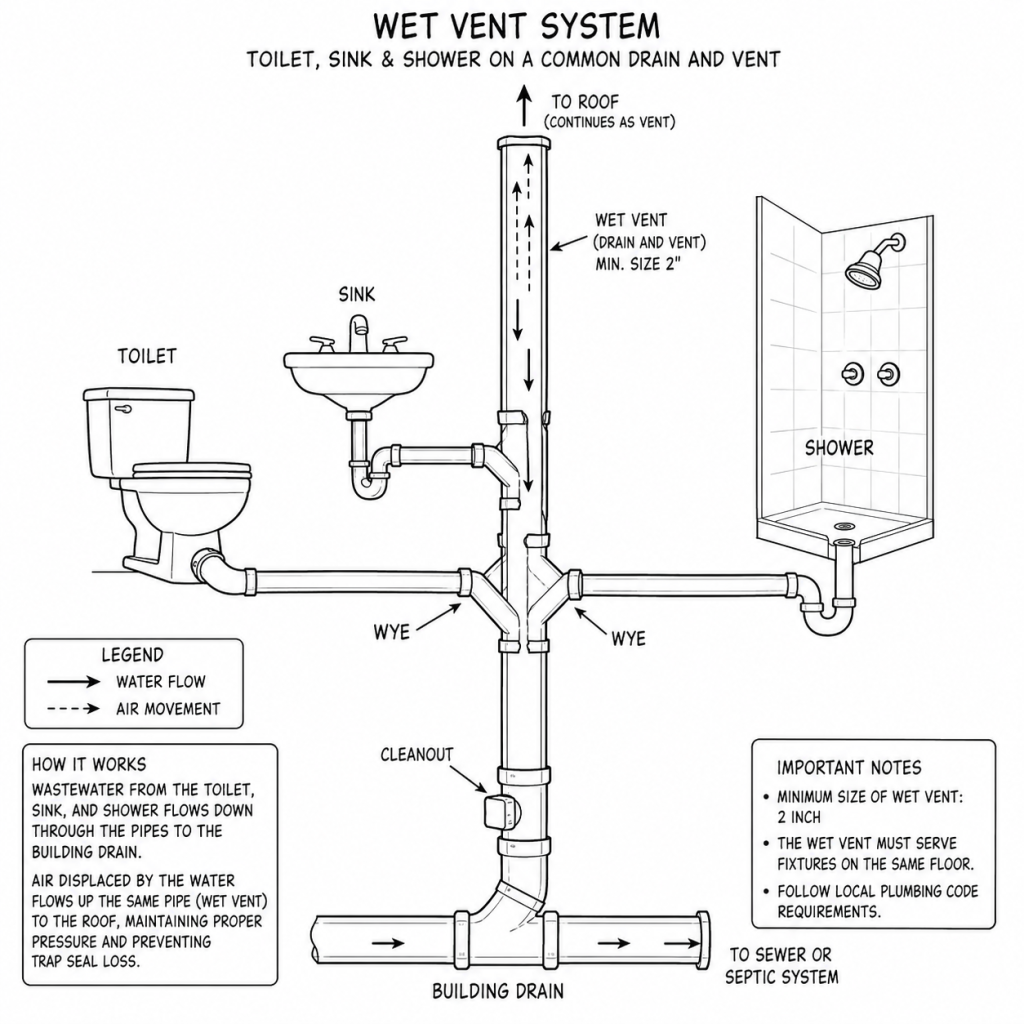
Wet Vent Plumbing Explained
A wet vent is a pipe that works as both a drain and a vent. This method is common in bathroom groups where a lavatory drain may also vent a toilet or shower drain.
A wet vent diagram usually shows a bathroom sink, toilet, and shower connected to a shared drain and vent pipe. The pipe must be sized and arranged correctly because it carries both wastewater and air.
Wet venting can be very efficient, but it is also one of the areas where local plumbing rules matter a lot. A wet vent layout that is accepted in one jurisdiction may not be accepted in another.
In basic terms:
- The wet vent pipe carries water from one fixture.
- The same pipe also provides air movement for another fixture.
- The pipe must maintain enough open air space to protect trap seals.
- Fixture order, pipe slope, pipe size, and connection points matter.
Searchers looking for wet vent plumbing diagram, horizontal wet vent diagram, vertical wet vent diagram, wet vent layout, and bathroom venting diagram usually need a visual explanation because the concept is harder to understand in text alone.
Kitchen Sink Vent Diagram and Island Vent Plumbing
Kitchen sinks also need venting. A standard kitchen sink near a wall may connect to a vertical vent inside the wall. The drain leaves the sink, passes through the P-trap, and connects to the wall drain. The vent rises inside the wall and connects to the vent stack or roof vent.
However, an island sink is different. A kitchen island is away from the wall, so there may be no easy place to run a conventional vertical vent pipe. This is where island vent plumbing or a loop vent may be used.
A loop vent, sometimes called an island fixture vent or bow vent, rises as high as possible under the countertop and then loops back down before connecting to the drain system. This layout helps provide air movement without a wall vent directly behind the sink.
Because island vent plumbing can be code-sensitive, it is important to check local requirements. Some areas may allow loop vents, some may require special sizing, and some may allow an approved air admittance valve in certain situations.

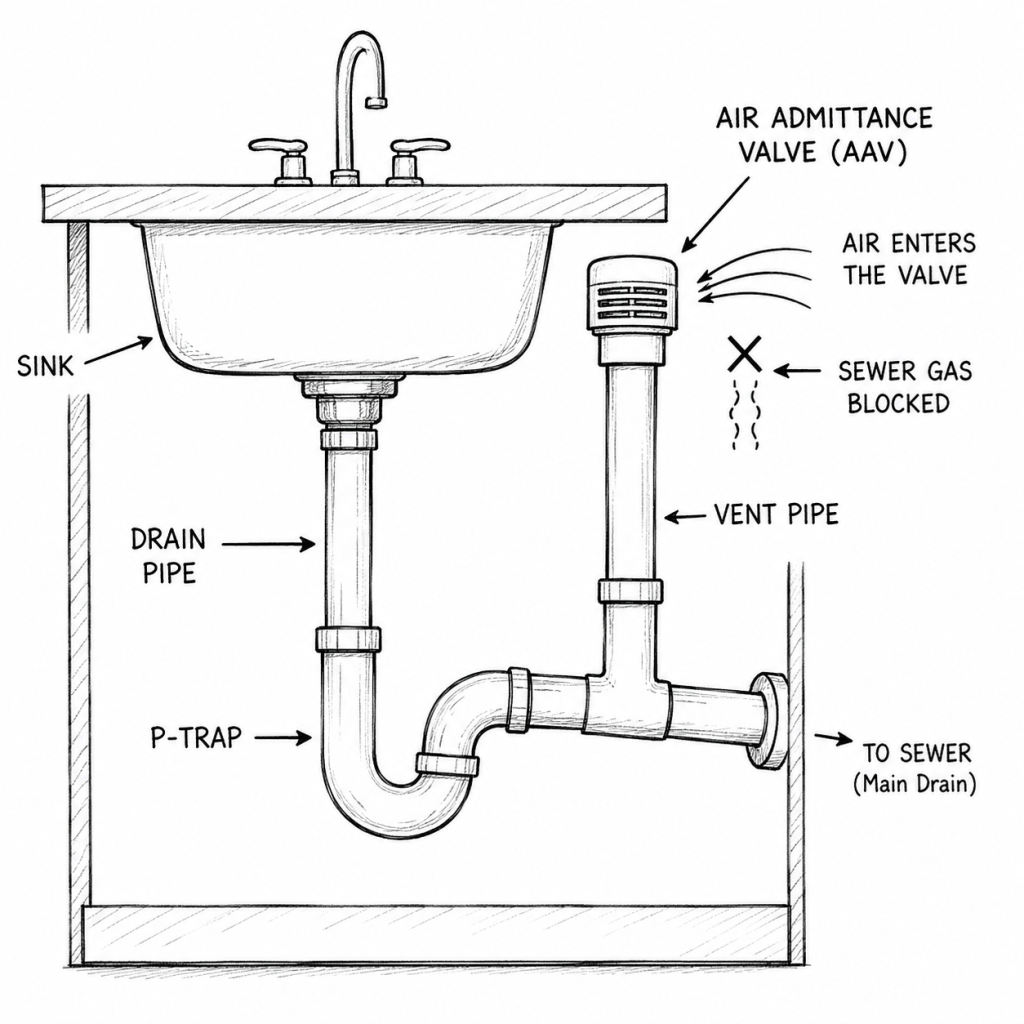
Air Admittance Valve: AAV Plumbing Vent
An Air Admittance Valve, also called an AAV, is a mechanical one-way valve. It opens when negative pressure occurs in the drain line, allowing air to enter. Then it closes to help block sewer gas from escaping into the building.
AAVs are often used under sinks where running a full vent pipe to the roof is difficult. They can be useful in remodels, additions, islands, and tight spaces. However, they are not allowed everywhere. Some plumbing codes permit them under specific rules, while other jurisdictions restrict or reject them.
An AAV is not the same as a full open vent through the roof. It lets air in, but it does not let sewer gas out. Many systems still require at least one vent stack or stack vent to extend outdoors.
A basic AAV diagram usually shows:
- Sink
- Drain pipe
- P-trap
- Short vertical vent pipe
- AAV at the top
- Arrows showing air entering
- Sewer gas blocked
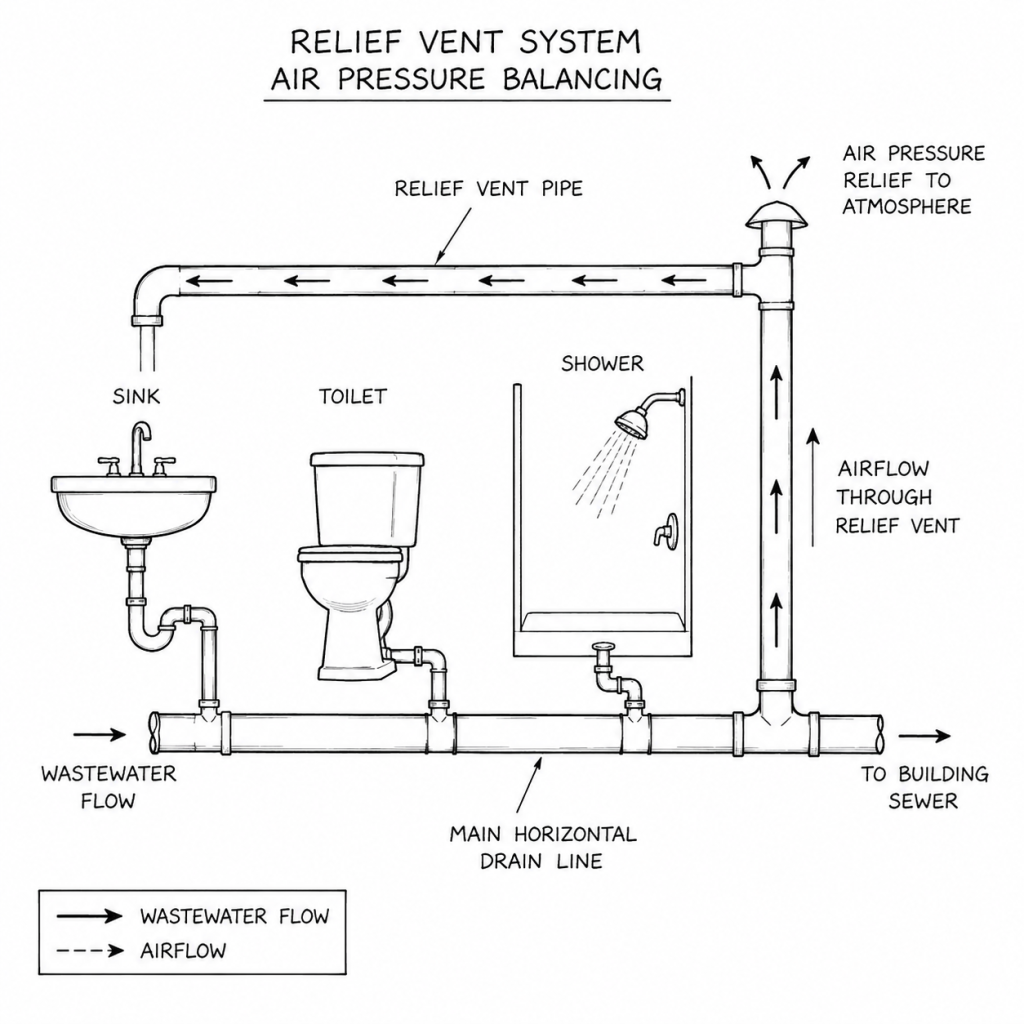
Relief Vent Plumbing
A relief vent is used to relieve pressure in certain venting systems. It is often associated with circuit venting, horizontal branches, or larger drainage layouts where pressure balancing is needed.
A relief vent helps air move through the drainage system so that fixtures do not experience trap siphonage or backpressure. It is not always needed in simple residential layouts, but it can be important in larger or more complex systems.
A relief vent plumbing diagram may show:
- A long horizontal drain line
- Multiple fixtures connected to the drain
- A vertical relief vent pipe
- Air pressure arrows
Connection to a main vent or open-air termination
Plumbing Venting Rules: Basic Code Concepts
Plumbing venting rules vary by location, but most codes are designed around the same goal: protect the trap seal and keep sewer gas out of the building.
Common plumbing vent requirements include:
1. Every Trap Must Be Protected
Most plumbing fixtures with a trap need a proper vent. The vent protects the trap seal from siphonage and backpressure.
2. Vent Distance Matters
The vent must be close enough to the trap. If the trap arm is too long, water flowing through the pipe can create suction and pull water out of the trap.
3. Vent Pipes Need Proper Slope
Vent pipes must be installed so moisture can drain back into the drainage system. Flat or poorly sloped vent piping can collect condensation and create blockages.
4. Vent Connections Must Be Above the Flood-Level Rim in Some Cases
Horizontal vent connections and branch vents often need to be located above the flood-level rim of the highest fixture served, depending on code and installation type.
5. Roof Vent Termination Must Be Correct
A plumbing roof vent must terminate in an approved location. It should be high enough and far enough from openings such as windows, doors, and air intakes as required by local code.
6. Pipe Size Must Match Fixture Load
Plumbing vent pipe size depends on fixture units, drain size, developed length, and the code being followed.
7. Local Code Always Controls
There is no single universal plumbing vent pipe code for every city, state, or country. Residential plumbing vent pipe code can vary by jurisdiction. Always check with the local authority having jurisdiction before installation.
Plumbing Vent Pipe Location
The correct plumbing vent pipe location depends on the fixture and the drainage layout. In many homes, vent pipes are hidden inside walls and connect to a roof vent. The visible part is usually the plumbing vent pipe outside the house or the plumbing vent on the roof.
Common locations include:
- Behind bathroom sinks
- Inside wet walls
- Near toilet drain stacks
- Behind kitchen sink walls
- Through attic spaces
- Above roof lines
- Under cabinets for approved AAV installations
- Near island sink loop vent layouts
When people ask what does a plumbing vent look like, the answer depends on where they are looking. On the roof, it may look like a short vertical pipe. Under a sink, it may look like a small vertical pipe with an AAV. Inside the wall, it may not be visible at all.
Does Every Plumbing Drain Need a Vent?
In general, every trapped fixture needs vent protection. That does not always mean every fixture needs its own separate vent pipe. Some fixtures may use individual vents, common vents, wet vents, circuit vents, or other approved venting methods.
For example:
- A bathroom sink may use an individual vent.
- Two nearby sinks may share a common vent.
- A toilet may be vented through a wet vent in a bathroom group.
- An island sink may use a loop vent or another approved method.
- Some fixtures may use an approved AAV.
The key is not whether each drain has a separate vent pipe. The key is whether each trap is properly protected by an approved venting method.
How to Tell If a Plumbing Vent Is Blocked
A blocked plumbing vent can cause symptoms that look like a drain clog. However, the problem may be air pressure instead of a physical blockage in the drain line.
Common signs of a blocked plumbing vent include:
Gurgling Drains
If a sink, tub, or shower gurgles after draining, the system may be pulling air through a nearby trap.
Bubbling Toilet
A toilet that bubbles when a sink, tub, or washing machine drains may indicate poor venting or a blocked vent.
Slow Drainage
Slow drainage is often caused by a clog, but it can also happen when the drain system cannot get enough air.
Sewer Smell
A sewer smell inside the home may mean a trap has lost its water seal. This can happen if the vent system is blocked or poorly designed.
Empty P-Traps
If a rarely used fixture smells bad, the water in the trap may have evaporated. But if the trap repeatedly loses water after use, venting may be the issue.
Common Causes of Plumbing Vent Problems
Plumbing vent problems can happen for several reasons:
- Leaves or debris in the roof vent
- Bird nests or small animal nests
- Ice or frost closing the vent in cold climates
- Poor pipe slope
- Undersized vent pipe
- Incorrect vent location
- Improper wet vent layout
- Blocked branch vent
- Damaged vent pipe
- Poor remodeling work
A blocked sewer vent can sometimes be cleared from the roof by a professional plumber. However, roof work can be dangerous, and plumbing vent diagnosis should be handled carefully.
Conclusion: A Plumbing Vent Diagram Makes the Whole System Easier to Understand
A plumbing vent diagram helps explain one of the most important parts of a home’s plumbing system. Drains do not work properly with water alone. They also need air. Plumbing vents protect P-traps, balance pressure, prevent sewer gas from entering the home, and help wastewater move smoothly through the drain system.
The most important venting components include the P-trap, trap arm, drain pipe, branch vent, stack vent, vent stack, and roof vent. Common venting methods include individual vents, common vents, wet vents, loop vents, air admittance valves, circuit vents, and relief vents.
For homeowners, diagrams make the system easier to understand. For contractors and plumbers, diagrams help communicate proper plumbing vent design. For bloggers and educators, labeled plumbing vent diagrams improve readability, user engagement, and SEO performance.
Before installing or changing any plumbing vent pipe, always check local plumbing venting rules and code requirements. The right layout depends on fixture location, pipe size, trap distance, vent type, and the code adopted in your area.
A properly designed plumbing vent system is not just about faster drainage. It is about safety, sanitation, odor control, and protecting the home from sewer gas. That is why every good plumbing guide should include clear diagrams, simple explanations, and accurate venting rules.